rudijs.github.com

Web Development, Web Operations, Devops Blog

Restricting Docker Container Access with Iptables

Overview

The Docker networking documentation shows how to easily restrict external container access to a single IP using Iptables.

Docker’s forward rules permit all external source IPs by default. 

To allow only a specific IP or network to access the containers, insert a negated rule at the top of the DOCKER filter chain. 

For example, to restrict external access such that only source IP 8.8.8.8 can access the containers, the following rule could be added:

$ iptables -I DOCKER -i ext_if ! -s 8.8.8.8 -j DROP

What’s the best approach for allowing, say, two external IP addresses?

Adding another rule negating another IP won’t work as the 1st negation would have already matched and returned from the table.

One approach is to create a PRE_DOCKER table with a final return of DROP or REJECT before the DOCKER table.

This blog post will detail a method for this approach that’s working well for my use case using Ubuntu 14.04 and Docker v1.7.

Method

To begin create a bash script, let’s name it docker_iptables.sh (mode 0755 executable).

This script will grant:

  • Public access to http and https only.
  • Two admin IPs will be granted access to all running containers.
  • Two LAN IPs will be granted access to all running containers.

Everything else will be rejected

This script must run after docker starts or restarts.

#!/usr/bin/env bash

# Usage:
# timeout 10 docker_iptables.sh
#
# Use the builtin shell timeout utility to prevent infinite loop (see below)

if [ ! -x /usr/bin/docker ]; then
    exit
fi

# Check if the PRE_DOCKER chain exists, if it does there's an existing reference to it.
iptables -C FORWARD -o docker0 -j PRE_DOCKER

if [ $? -eq 0 ]; then
    # Remove reference (will be re-added again later in this script)
    iptables -D FORWARD -o docker0 -j PRE_DOCKER
    # Flush all existing rules
    iptables -F PRE_DOCKER
else
    # Create the PRE_DOCKER chain
    iptables -N PRE_DOCKER
fi

# Default action
iptables -I PRE_DOCKER -j DROP

# Docker Containers Public Admin access (insert your IPs here)
iptables -I PRE_DOCKER -i eth0 -s 192.184.41.144 -j ACCEPT
iptables -I PRE_DOCKER -i eth0 -s 120.29.76.14 -j ACCEPT

# Docker Containers Restricted LAN Access (insert your LAN IP range or multiple IPs here)
iptables -I PRE_DOCKER -i eth1 -s 192.168.1.101 -j ACCEPT
iptables -I PRE_DOCKER -i eth1 -s 192.168.1.102 -j ACCEPT

# Docker internal use
iptables -I PRE_DOCKER -o docker0 -m conntrack --ctstate RELATED,ESTABLISHED -j ACCEPT
iptables -I PRE_DOCKER -i docker0 ! -o docker0 -j ACCEPT
iptables -I PRE_DOCKER -m state --state RELATED -j ACCEPT
iptables -I PRE_DOCKER -i docker0 -o docker0 -j ACCEPT

# Docker container named www-nginx public access policy
WWW_IP_CMD="/usr/bin/docker inspect --format='{{.NetworkSettings.IPAddress}}' www-nginx"
WWW_IP=$($WWW_IP_CMD)

# Double check, wait for docker socket (upstart docker.conf already does this)
while [ ! -e "/var/run/docker.sock" ]; do echo "Waiting for /var/run/docker.sock..."; sleep 1; done

# Wait for docker web server container IP
while [ -z "$WWW_IP" ]; do echo "Waiting for www-nginx IP..."; WWW_IP=$($WWW_IP_CMD); done

# Insert web server container filter rules
iptables -I PRE_DOCKER -i eth0 -p tcp -d $WWW_IP --dport 80  -j ACCEPT
iptables -I PRE_DOCKER -i eth0 -p tcp -d $WWW_IP --dport 443 -j ACCEPT

# Finally insert the PRE_DOCKER table before the DOCKER table in the FORWARD chain.
iptables -I FORWARD -o docker0 -j PRE_DOCKER

It’s important to note the usage of this script uses the builtin shell command timeout.

This is to prevent the script from hanging the machine if there’s any error while waiting for Docker.

Note: As Docker is forwarding to port 80 we wait for the IP address of the container.

This is because if we want to forward to port 80 on another container, without the destination IP

the one rule will grant access to all containers forwarding to port 80.

Usage

Using Upstart with Ubuntu 14.04 add this script /etc/init/docker-iptables.conf

Whenever docker starts or restarts it will run the docker_iptables.sh script.

Note: Adjust the path to script and email address to suit your environment.

description "Start Docker Custom Iptables Rules"
author "your@email.com"

start on started docker

script
    /usr/bin/timeout 30 /home/ubuntu/docker_iptables.sh
end script

Summary

So far my experience using this approach is working well.

I’m using Firehol to manage my firewall policies.

I’ve updated the firehol start/stop/restart init script to restart docker.

On docker’s start/restart upstart event the docker_iptables.sh (the above script) will run.

This three stage process:

  • Reloads the iptables firewall policies.
  • Restarts all docker containers.
  • Then filters access to the running docker containers.

I hope this helps, comments and feedback are very much welcomed.

If I’ve overlooked anything, if you can see room for improvement or if any errors please do let me know.

Thanks!
Initialize Zurb Foundation 5 in an AngularJS Directive with Tests

Overview

Create an AngularJS custom directive that uses a Foundation Modal display with 100% test coverage.

Code

1) directive-foundation-modal.js

(function () {
  'use strict';

  angular.module('app')

    .controller('foundationModalController', function () {

      // As the template has Zurb Foundation JS (modal box) content,
      // call #foundation() on the document so DOM picks it up.
      $(document).foundation();
    })
    .directive('foundationModal', function () {
    return {
      restrict: 'E',
      templateUrl: 'templates/foundation-modal.html',
      controller: 'foundationModalController as foundationModal'
    };
  });

})();

2) templates/foundation-modal.html

<a href="#" data-reveal-id="myModal">Click Me For A Modal</a>

<div id="myModal" class="reveal-modal" data-reveal>
<h2>Awesome. I have it.</h2>
  <p class="lead">Your couch.  It is mine.</p>
  <p>Im a cool paragraph that lives inside of an even cooler modal. Wins</p>
  <a class="close-reveal-modal">&#215;</a>
</div>

3) directive-foundation-modal_spec.js

(function () {
  'use strict';

  describe('Directive', function () {

    var $scope,
      element,
      $compile,
      $httpBackend,
      $controller;

    // Load the controllers module
    beforeEach(module('app'));

    beforeEach(inject(function (_$compile_, $rootScope, _$httpBackend_, _$controller_) {

      $compile = _$compile_;

      $httpBackend = _$httpBackend_;

      $scope = $rootScope.$new();

      $controller = _$controller_;

    }));

    describe('foundationModal Directive', function () {

      it('loads foundation modal html partial', function () {

        var elm = angular.element('<foundation-modal></foundation-modal>');

        element = $compile(elm)($scope);

        $httpBackend.expectGET('templates/foundation-modal.html').respond(200, '<div>Modal Box</div>');

        $scope.$apply();

      });

    });

    describe('foundationModalController', function () {

      it('calls #foundation() on load', function () {

        spyOn($.fn, 'foundation');

        $controller('foundationModalController', {
          $scope: $scope
        });

        $scope.$apply();

        expect($.fn.foundation).toHaveBeenCalled();
      });

    });

  });

})();
MEANR Continuous Integration with Jenkins and Docker

Overview

In this post we will look at Continuous Integration with the MEAN/MEANR stack using Jenkins and Docker.

We will:

  1. Review the build steps
  2. Step through Jenkins installation and setup on a Ubuntu linux machine
  3. Run an initial build

Jenkins

Jenkins is an open source continuous integration tool written in Java and provides continuous integration services.

You can host Jenkins yourself locally or remote or use a cloud provider.

Future Steps

In a future post we’ll look at deployment with Jenkins, Docker and Chef.

After a successfull build Jenkins will build a new docker container which will be used for production deployment.

Requirements

1. Docker installed.
2. Java JDK installed.

Build Task Steps

Before we begin with the Jenkins installation and configuration lets review the actual CI build steps.

Each CI build will trigger these steps one after each other.

An error at any point will stop and fail the build.

  • check node is present
  • Install npm global dependencies
  • Install npm application dependencies
  • Install front end applicaiton dependencies with bower
  • Initialize the MEANR default configuration files
  • Start a Redis docker container
  • Test and wait for a Redis Connection
  • Start a MongoDB Container
  • Test and wait for a MongoDB Connection
  • Run test: jshint
  • Run test: node.js mocha
  • Run test: AngularJS Karma
  • Start the node web server
  • Test and wait for a node http Connection
  • Seed the MongoDB database with a test user account
  • Run test: API HTTP requests
  • Stop the node web server
  • Stop the Redis Container
  • Remove the Redis Container
  • Stop the Mongodb Container
  • Remove the MongoDB Container

Pull required docker images

For each CI build a MongoDB instance will start and allocate a new database (about 3GB of space).

The rudijs/mongodb-ci docker image is build with this in mind.

You can build your own with this Dockerfile or pull a pre-built image from the public docker registry:

sudo docker pull rudijs/mongodb-ci

For each CI build a Redis instance will start

You can build your own with this Dockerfile or pull a pre-built image from the public docker registry:

sudo docker pull rudijs/redis

Create a jenkins user account

sudo useradd -d /home/jenkins/ -m -c 'Jenkins CI' -s /bin/bash -U jenkins

Create a ssh public key (without password)

sudo -i -u jenkins ssh-keygen -t rsa

Connect to github and accept the new known host

sudo -i -u jenkins ssh git@github.com

Add the jenkins user .ssh/id_rsa.pub ssh public key to github.com ssh keys

Grant the jenkins user account access to docker

Create an /etc/sudoers.d/jenkins file and add this content

jenkins ALL = (root) NOPASSWD:/usr/bin/docker

Download Jenkins

sudo -i -u jenkins wget http://mirrors.jenkins-ci.org/war/latest/jenkins.war

Download and unzip Node.js

sudo -i -u jenkins wget http://nodejs.org/dist/v0.10.25/node-v0.10.25-linux-x64.tar.gz
sudo -i -u jenkins tar -zxvf node-v0.10.25-linux-x64.tar.gz

Start the Jenkins CI server

sudo -i -u jenkins java -jar /home/jenkins/jenkins.war

Open up a browser at:

http://localhost:8080/

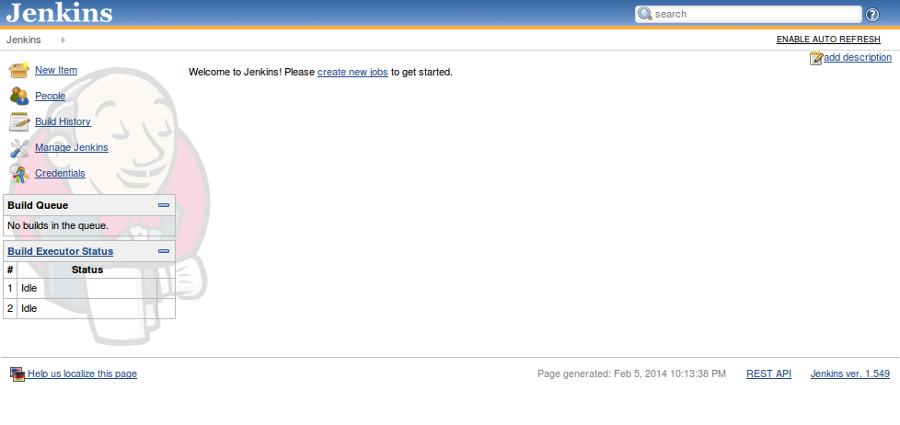
Jenkins Home Page

Update any existing plugins

  1. Click Manage Jenkins
  2. Click Manage Plugins
  3. Select all the plugins that are listed under the Updates tab
  4. Click Install without restart

Add these two new plugins

Git Plugin
This plugin allows use of Git as a build SCM.

Post build task
This plugin allows the user to execute a shell/batch task depending on the build log output.
  1. Click the Available tab
  2. Use the filter, enter git plugin and select the Git Plugin
  3. Click Install without restart
  4. Get back to the Available plugins tab use the filter, enter post build and select the Post build task
  5. Click Install without restart

Configure Ant

Configure Ant

  1. Click Manage Jenkins then click Configure System
  2. Under Ant click Add Ant
  3. Enter the name value of 1.9.3
  4. Click Add Installer
  5. Select Install from Apache
  6. Click Save

Configure Ant

Configure Email

  1. Under Jenkins Location
  2. Update the System Admin e-mail address with your email address
  3. Click Save

Add a new CI task

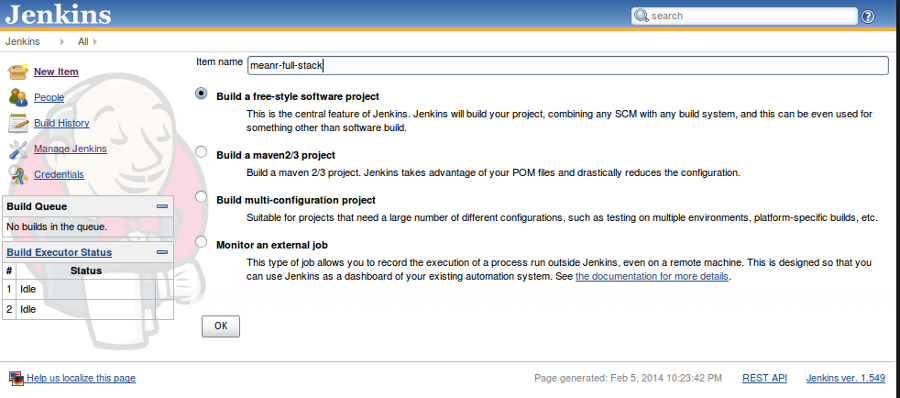
  1. Click New Item
  2. Enter the Item Name as meanr-full-stack
  3. Select Build a free-style software project
  4. Click OK

Add a new CI Task

Configure CI task

  1. Under Source Code Management select Git
  2. Enter the Repository URL git@github.com:rudijs/meanr-full-stack.git
  3. Click Apply

Configure CI task

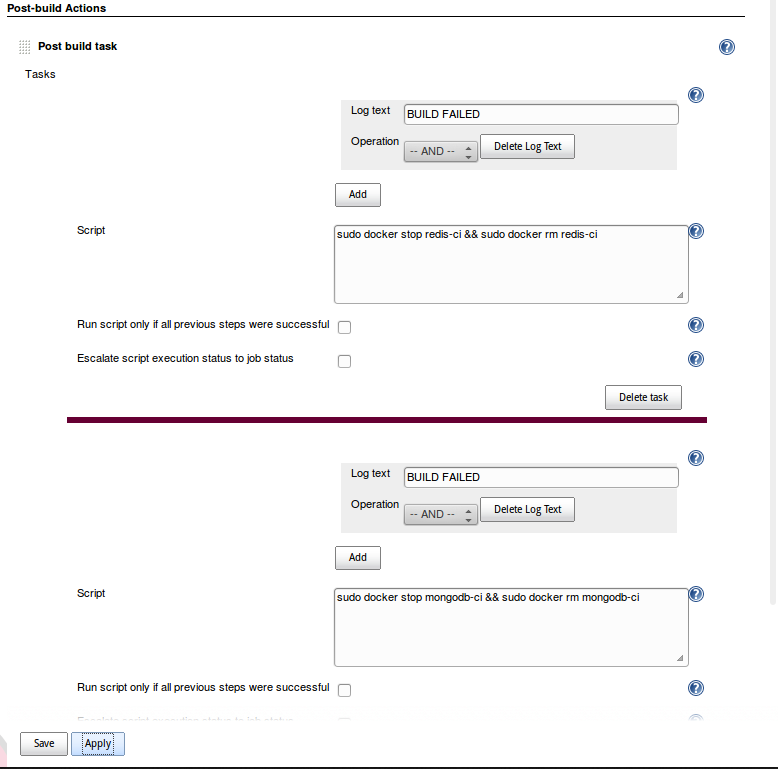
If and when the build fails we want to clean up and remove any running docker CI instances.

  1. Under Post-build Actions click Add post-build action and select Post build task
  2. Enter the Log text input value of BUILD FAILED
  3. Enter Script input value of sudo docker stop redis-ci && sudo docker rm redis-ci
  4. Click Add another task
  5. Enter the Log text input value of BUILD FAILED
  6. Enter Script input value of sudo docker stop mongodb-ci && sudo docker rm mongodb-ci
  7. Click Apply

Add Post Build Action

Add a build step. Under Build click Add build step and select Invoke Ant

  1. Under Ant version click and select 1.9.3
  2. Click Save

Add a Build Step

Run the a build

Everything should be setup and good to go, click Build now

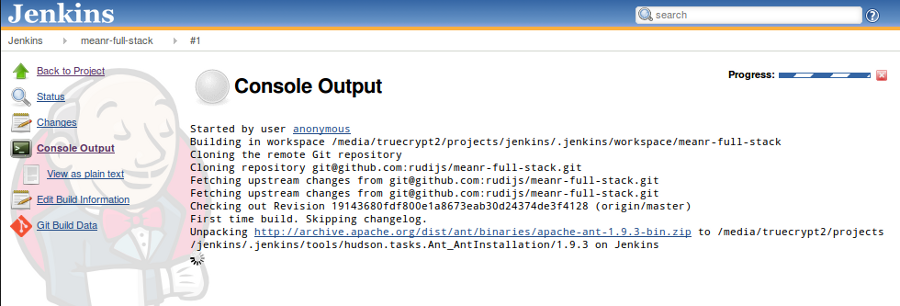
The build will start, under Build History click the flashing build icon to view the build output.

The first build will checkout the git repository and download Ant.

Run first Build

Command line build

You can trigger a command line build with a curl command

curl 'http://localhost:8080/job/ride-share-market/build?delay=0sec'

You can trigger a build with each git push like so:

git push && git push --tags && curl 'http://localhost:8080/job/ride-share-market/build?delay=0sec'

Abreviatted build console output

Started by user anonymous
Building in workspace /media/truecrypt2/projects/jenkins/.jenkins/workspace/meanr-full-stack
Fetching changes from the remote Git repository
Fetching upstream changes from git@github.com:rudijs/meanr-full-stack.git
Checking out Revision b2af2dd959a144bde511965f41943db410b2b2bb (origin/master)
[meanr-full-stack] $ /media/truecrypt2/projects/jenkins/.jenkins/tools/hudson.tasks.Ant_AntInstallation/1.9.3/bin/ant
Unable to locate tools.jar. Expected to find it in /usr/lib/jvm/java-6-openjdk-amd64/lib/tools.jar
Buildfile: /media/truecrypt2/projects/jenkins/.jenkins/workspace/meanr-full-stack/build.xml

check-node:
     [exec] v0.10.25

npm-global:
     [exec] npm http GET https://registry.npmjs.org/grunt-cli
     [exec] npm http GET https://registry.npmjs.org/bower
     [exec] npm http 304 https://registry.npmjs.org/bower
     [exec] npm http 304 https://registry.npmjs.org/grunt-cli
...
...
     [exec] ├── bower-config@0.5.0 (mout@0.6.0, optimist@0.6.0)
     [exec] ├── bower-registry-client@0.1.6 (request-replay@0.2.0, async@0.2.10, bower-config@0.4.5)
     [exec] ├── cardinal@0.4.4 (ansicolors@0.2.1, redeyed@0.4.2)
     [exec] ├── decompress-zip@0.0.4 (mkpath@0.1.0, touch@0.0.2, binary@0.3.0, readable-stream@1.1.10)
     [exec] ├── inquirer@0.3.5 (mute-stream@0.0.3, async@0.2.10, lodash@1.2.1, cli-color@0.2.3)
     [exec] ├── update-notifier@0.1.7 (configstore@0.1.7)
     [exec] ├── handlebars@1.0.12 (optimist@0.3.7, uglify-js@2.3.6)
     [exec] └── request@2.27.0 (json-stringify-safe@5.0.0, forever-agent@0.5.2, aws-sign@0.3.0, qs@0.6.6, tunnel-agent@0.3.0, oauth-sign@0.3.0, cookie-jar@0.3.0, node-uuid@1.4.1, mime@1.2.11, hawk@1.0.0, form-data@0.1.2, http-signature@0.10.0)

npm-local:
     [exec] npm http GET https://registry.npmjs.org/express-params/0.0.3
     [exec] npm http GET https://registry.npmjs.org/winston
     [exec] npm http GET https://registry.npmjs.org/ejs
     [exec] npm http GET https://registry.npmjs.org/express-winston
     [exec] npm http GET https://registry.npmjs.org/nconf
     [exec] npm http GET https://registry.npmjs.org/winston-loggly
     [exec] npm http GET https://registry.npmjs.org/mongoose
     [exec] npm http GET https://registry.npmjs.org/scrypt
     [exec] npm http GET https://registry.npmjs.org/passport
     [exec] npm http GET https://registry.npmjs.org/passport-local
     [exec] npm http GET https://registry.npmjs.org/passport-github
     [exec] npm http GET https://registry.npmjs.org/passport-google
     [exec] npm http GET https://registry.npmjs.org/passport-facebook
     [exec] npm http GET https://registry.npmjs.org/connect-flash
     [exec] npm http GET https://registry.npmjs.org/redis
     [exec] npm http GET https://registry.npmjs.org/connect-redis
...
...
     [exec]
     [exec] karma-phantomjs-launcher@0.1.2 node_modules/karma-phantomjs-launcher
     [exec] └── phantomjs@1.9.7-1 (which@1.0.5, rimraf@2.2.6, kew@0.1.7, ncp@0.4.2, mkdirp@0.3.5, adm-zip@0.2.1, npmconf@0.0.24)
     [exec]
     [exec] karma@0.10.9 node_modules/karma
     [exec] ├── di@0.0.1
     [exec] ├── rimraf@2.1.4
     [exec] ├── colors@0.6.0-1
     [exec] ├── graceful-fs@1.2.3
     [exec] ├── mime@1.2.11
     [exec] ├── q@0.9.7
     [exec] ├── coffee-script@1.6.3
     [exec] ├── lodash@1.1.1
     [exec] ├── optimist@0.3.7 (wordwrap@0.0.2)
     [exec] ├── minimatch@0.2.14 (sigmund@1.0.0, lru-cache@2.5.0)
     [exec] ├── glob@3.1.21 (inherits@1.0.0)
     [exec] ├── useragent@2.0.7 (lru-cache@2.2.4)
     [exec] ├── log4js@0.6.9 (semver@1.1.4, async@0.1.15, readable-stream@1.0.25)
     [exec] ├── connect@2.8.8 (methods@0.0.1, uid2@0.0.2, pause@0.0.1, cookie-signature@1.0.1, fresh@0.2.0, qs@0.6.5, debug@0.7.4, bytes@0.2.0, buffer-crc32@0.2.1, cookie@0.1.0, formidable@1.0.14, send@0.1.4)
     [exec] ├── http-proxy@0.10.4 (pkginfo@0.3.0, optimist@0.6.0, utile@0.2.1)
     [exec] ├── chokidar@0.8.1
     [exec] └── socket.io@0.9.16 (base64id@0.1.0, policyfile@0.0.4, redis@0.7.3, socket.io-client@0.9.16)

bower:
     [exec] bower restangular#~1.1.8                      not-cached git://github.com/mgonto/restangular.git#~1.1.8
     [exec] bower restangular#~1.1.8                         resolve git://github.com/mgonto/restangular.git#~1.1.8
     [exec] bower lodash#~2.4.1                           not-cached git://github.com/lodash/lodash.git#~2.4.1
     [exec] bower lodash#~2.4.1                              resolve git://github.com/lodash/lodash.git#~2.4.1
     [exec] bower foundation#~5.0.2                       not-cached git://github.com/zurb/bower-foundation.git#~5.0.2
     [exec] bower foundation#~5.0.2                          resolve git://github.com/zurb/bower-foundation.git#~5.0.2
...
...
     [exec] modernizr#2.7.1 app/bower_components/modernizr
     [exec]
     [exec] json3#3.2.6 app/bower_components/json3

grunt-init:
     [exec] Running "copy:configs" (copy) task
     [exec] Copied 12 files
     [exec]
     [exec] Done, without errors.
     [exec]
     [exec]
     [exec] Execution Time (2014-02-05 15:16:03 UTC)
     [exec] loading tasks   3ms  ▇▇▇ 5%
     [exec] init            1ms  ▇ 2%
     [exec] copy:configs   53ms  ▇▇▇▇▇▇▇▇▇▇▇▇▇▇▇▇▇▇▇▇▇▇▇▇▇▇▇▇▇▇▇▇▇▇▇▇▇▇▇▇▇▇▇ 90%
     [exec] Total 59ms

start-redis-container:
     [exec] 9c4b156e2a6c3fa71bb3650383375f4e20560a46b58ed445641650e14de7d0fb
     [echo] Sleep for 5 seconds to allow the new Redis start

test-redis-connect:

start-mongodb-container:
     [exec] 405a7b5bdd8a01087a37b75b7db2243223378e4f7c24c436f6f85fcb66e608de
     [echo] Sleep for 60 seconds to allow the new MongoDB instance to pre-allocate 3GBs of database filesystem space

test-mongodb-connect:
   [delete] Deleting: /tmp/mongodb-ci_status.txt

jshint:
     [exec] Running "jshint:all" (jshint) task
     [exec] >> 55 files lint free.
     [exec]
     [exec] Done, without errors.
     [exec]
     [exec]
     [exec] Execution Time (2014-02-05 15:17:55 UTC)
     [exec] jshint:all  1.3s  ▇▇▇▇▇▇▇▇▇▇▇▇▇▇▇▇▇▇▇▇▇▇▇▇▇▇▇▇▇▇▇▇▇▇▇▇▇▇▇▇▇▇▇▇▇▇▇▇▇▇ 99%
     [exec] Total 1.3s

test:
     [exec] Running "env:ci" (env) task
     [exec]
     [exec] Running "mochaTest:test" (mochaTest) task
     [exec]
     [exec]
     [exec]   <Unit Test>
     [exec]     Express config
     [exec]       ◦ handles server 500 errors:
     [exec]       ✓ handles server 500 errors (204ms)
     [exec]       ◦ handles server 404 errors by 301 permanent redirect to AngularJS:
     [exec]       ✓ handles server 404 errors by 301 permanent redirect to AngularJS
     [exec]
     [exec]   <Unit Test>
     [exec]     Articles Controller
     [exec]       ◦ #create() should save to the database, respond with 201 status code and the new mongoose article object:
     [exec]       ✓ #create() should save to the database, respond with 201 status code and the new mongoose article object
     [exec]       ◦ #create() handles model validation errors:
     [exec]       ✓ #create() handles model validation errors
     [exec]       ◦ #create() handles database errors:
     [exec]       ✓ #create() handles database errors
     [exec]       ◦ #all() finds all articles:
     [exec]       ✓ #all() finds all articles (45ms)
     [exec]       ◦ #all() handles database errors:
     [exec]       ✓ #all() handles database errors
     [exec]       ◦ #show() finds a single article:
     [exec]       ✓ #show() finds a single article
     [exec]       ◦ #show() handles not found article:
     [exec]       ✓ #show() handles not found article
     [exec]       ◦ #show() handles database errors:
     [exec]       ✓ #show() handles database errors
     [exec]       ◦ #update() updates a article:
     [exec]       ✓ #update() updates a article
     [exec]       ◦ #update() handles unknown article update request errors:
     [exec]       ✓ #update() handles unknown article update request errors
     [exec]       ◦ #update() handles database errors:
     [exec]       ✓ #update() handles database errors
     [exec]       ◦ #update() handles validation errors:
     [exec]       ✓ #update() handles validation errors
     [exec]       ◦ #destroy() deletes a article:
     [exec]       ✓ #destroy() deletes a article
     [exec]       ◦ #destroy() handles model validation errors:
     [exec]       ✓ #destroy() handles model validation errors
     [exec]
     [exec]   <Unit Test>
     [exec]     Default Controller
     [exec]       ◦ #render() returns a non-logged in page:
     [exec]       ✓ #render() returns a non-logged in page
     [exec]       ◦ #render() returns a logged in page:
     [exec]       ✓ #render() returns a logged in page
     [exec]       ◦ #render() in production uses dist/index.html:
     [exec]       ✓ #render() in production uses dist/index.html
     [exec]
     [exec]   <Unit Test>
     [exec]     Users Controller
     [exec]       ◦ #authCallback redirects to default route:
     [exec]       ✓ #authCallback redirects to default route
     [exec]       ◦ #signin calls redirects to default route:
     [exec]       ✓ #signin calls redirects to default route
     [exec]       ◦ #signout calls req.logout() and redirect to default route:
     [exec]       ✓ #signout calls req.logout() and redirect to default route
     [exec]       ◦ #session redirects to default route:
     [exec]       ✓ #session redirects to default route
     [exec]       ◦ #create adds a new user then calls passportjs.login() and redirects to the default route:
     [exec]       ✓ #create adds a new user then calls passportjs.login() and redirects to the default route (69ms)
     [exec]       ◦ #create handles database validation errors:
     [exec]       ✓ #create handles database validation errors
     [exec]       ◦ #create handles duplicate email database validation errors:
     [exec]       ✓ #create handles duplicate email database validation errors
     [exec]       ◦ #create handles req.LogIn errors:
     [exec]       ✓ #create handles req.LogIn errors (50ms)
     [exec]
     [exec]   <Unit Test>
     [exec]     Model Article:
     [exec]       Method Save
     [exec]         ◦ should save an article:
     [exec]         ✓ should save an article
     [exec]         ◦ should find a article:
     [exec]         ✓ should find a article
     [exec]         ◦ should show an error if TITLE is not defined:
     [exec]         ✓ should show an error if TITLE is not defined
     [exec]         ◦ should show an error without a TITLE value:
     [exec]         ✓ should show an error without a TITLE value
     [exec]         ◦ should show an error if TITLE is too short:
     [exec]         ✓ should show an error if TITLE is too short
     [exec]         ◦ should show an error if CONTENT is not defined:
     [exec]         ✓ should show an error if CONTENT is not defined
     [exec]         ◦ should show an error if CONTENT is not defined:
     [exec]         ✓ should show an error if CONTENT is not defined
     [exec]         ◦ should show an error without a CONTENT value:
     [exec]         ✓ should show an error without a CONTENT value
     [exec]         ◦ should show an error if CONTENT is too short:
     [exec]         ✓ should show an error if CONTENT is too short
     [exec]
     [exec]   <Unit Test>
     [exec]     Model User:
     [exec]       Method Save
     [exec]         ◦ should save without problems:
     [exec]         ✓ should save without problems (61ms)
     [exec]         ◦ #authenticate returns true for correct password:
     [exec]         ✓ #authenticate returns true for correct password (117ms)
     [exec]         ◦ #authenticate returns false for incorrect password:
     [exec]         ✓ #authenticate returns false for incorrect password (109ms)
     [exec]         ◦ should not store plain text password:
     [exec]         ✓ should not store plain text password (50ms)
     [exec]         ◦ #encryptPassword return empty string if no password input:
     [exec]         ✓ #encryptPassword return empty string if no password input
     [exec]
     [exec]   <Unit Test>
     [exec]     Utils User
     [exec]       ◦ returns a user object with restricted properties from passportjs req.user:
     [exec]       ✓ returns a user object with restricted properties from passportjs req.user
     [exec]       ◦ returns null if no passortjs req.user properties:
     [exec]       ✓ returns null if no passortjs req.user properties
     [exec]
     [exec]
     [exec]   43 passing (2s)
     [exec]
     [exec]
     [exec] Running "mochaTest:coverage" (mochaTest) task
     [exec]
     [exec] Done, without errors.
     [exec]
     [exec]
     [exec] Execution Time (2014-02-05 15:17:58 UTC)
     [exec] mochaTest:test       7.2s  ▇▇▇▇▇▇▇▇▇▇▇▇▇▇▇▇▇▇▇▇▇▇▇▇▇▇▇▇▇▇▇▇▇▇▇▇▇▇▇▇▇ 96%
     [exec] mochaTest:coverage  274ms  ▇▇ 4%
     [exec] Total 7.5s

karma:
     [exec] Running "karma:continuous" (karma) task
     [exec] INFO [karma]: Karma v0.10.9 server started at http://localhost:9876/
     [exec] INFO [launcher]: Starting browser PhantomJS
     [exec] INFO [PhantomJS 1.9.7 (Linux)]: Connected on socket Lzt-785ewax_QOH3oK6i
     [exec] PhantomJS 1.9.7 (Linux): Executed 1 of 31 SUCCESS (0 secs / 0.019 secs)
     [exec] PhantomJS 1.9.7 (Linux): Executed 2 of 31 SUCCESS (0 secs / 0.028 secs)
     [exec] PhantomJS 1.9.7 (Linux): Executed 3 of 31 SUCCESS (0 secs / 0.031 secs)
     [exec] PhantomJS 1.9.7 (Linux): Executed 4 of 31 SUCCESS (0 secs / 0.034 secs)
     [exec] PhantomJS 1.9.7 (Linux): Executed 5 of 31 SUCCESS (0 secs / 0.048 secs)
     [exec] PhantomJS 1.9.7 (Linux): Executed 6 of 31 SUCCESS (0 secs / 0.053 secs)
     [exec] PhantomJS 1.9.7 (Linux): Executed 7 of 31 SUCCESS (0 secs / 0.057 secs)
     [exec] PhantomJS 1.9.7 (Linux): Executed 8 of 31 SUCCESS (0 secs / 0.06 secs)
     [exec] PhantomJS 1.9.7 (Linux): Executed 9 of 31 SUCCESS (0 secs / 0.064 secs)
     [exec] PhantomJS 1.9.7 (Linux): Executed 10 of 31 SUCCESS (0 secs / 0.068 secs)
     [exec] PhantomJS 1.9.7 (Linux): Executed 11 of 31 SUCCESS (0 secs / 0.077 secs)
     [exec] PhantomJS 1.9.7 (Linux): Executed 12 of 31 SUCCESS (0 secs / 0.081 secs)
     [exec] PhantomJS 1.9.7 (Linux): Executed 13 of 31 SUCCESS (0 secs / 0.085 secs)
     [exec] PhantomJS 1.9.7 (Linux): Executed 14 of 31 SUCCESS (0 secs / 0.089 secs)
     [exec] PhantomJS 1.9.7 (Linux): Executed 15 of 31 SUCCESS (0 secs / 0.091 secs)
     [exec] PhantomJS 1.9.7 (Linux): Executed 16 of 31 SUCCESS (0 secs / 0.093 secs)
     [exec] PhantomJS 1.9.7 (Linux): Executed 17 of 31 SUCCESS (0 secs / 0.094 secs)
     [exec] PhantomJS 1.9.7 (Linux): Executed 18 of 31 SUCCESS (0 secs / 0.096 secs)
     [exec] PhantomJS 1.9.7 (Linux): Executed 19 of 31 SUCCESS (0 secs / 0.097 secs)
     [exec] PhantomJS 1.9.7 (Linux): Executed 20 of 31 SUCCESS (0 secs / 0.098 secs)
     [exec] PhantomJS 1.9.7 (Linux): Executed 21 of 31 SUCCESS (0 secs / 0.101 secs)
     [exec] PhantomJS 1.9.7 (Linux): Executed 22 of 31 SUCCESS (0 secs / 0.103 secs)
     [exec] PhantomJS 1.9.7 (Linux): Executed 23 of 31 SUCCESS (0 secs / 0.103 secs)
     [exec] PhantomJS 1.9.7 (Linux): Executed 24 of 31 SUCCESS (0 secs / 0.11 secs)
     [exec] PhantomJS 1.9.7 (Linux): Executed 25 of 31 SUCCESS (0 secs / 0.111 secs)
     [exec] PhantomJS 1.9.7 (Linux): Executed 26 of 31 SUCCESS (0 secs / 0.114 secs)
     [exec] PhantomJS 1.9.7 (Linux): Executed 27 of 31 SUCCESS (0 secs / 0.116 secs)
     [exec] PhantomJS 1.9.7 (Linux): Executed 28 of 31 SUCCESS (0 secs / 0.118 secs)
     [exec] PhantomJS 1.9.7 (Linux): Executed 29 of 31 SUCCESS (0 secs / 0.12 secs)
     [exec] PhantomJS 1.9.7 (Linux): Executed 30 of 31 SUCCESS (0 secs / 0.121 secs)
     [exec] PhantomJS 1.9.7 (Linux): Executed 31 of 31 SUCCESS (0 secs / 0.122 secs)
     [exec] PhantomJS 1.9.7 (Linux): Executed 31 of 31 SUCCESS (0.553 secs / 0.122 secs)
     [exec]
     [exec] Done, without errors.
     [exec]
     [exec]
     [exec] Execution Time (2014-02-05 15:18:06 UTC)
     [exec] karma:continuous  7.9s  ▇▇▇▇▇▇▇▇▇▇▇▇▇▇▇▇▇▇▇▇▇▇▇▇▇▇▇▇▇▇▇▇▇▇▇▇▇▇▇▇▇▇▇▇ 100%
     [exec] Total 8s

app-start:

test-node-app-connect:
    [retry] Attempt [0]: error occurred; retrying after 1000 ms...
    [retry] Attempt [1]: error occurred; retrying after 1000 ms...

app-seed:

api-test:
     [exec]
     [exec] > meanr-full-stack@0.1.12 test /media/truecrypt2/projects/jenkins/.jenkins/workspace/meanr-full-stack
     [exec] > ./node_modules/grunt-mocha-test/node_modules/mocha/bin/_mocha --reporter spec --no-colors test/api/*.js
     [exec]
     [exec] http://meanr.local:3001
     [exec]
     [exec]
     [exec]   Unauthorized requests
     [exec]     POST /api/v1/articles
     [exec]       ◦ rejects unauthorized post:
     [exec]       ✓ rejects unauthorized post
     [exec]     PUT /api/v1/articles/:articleId
     [exec]       ◦ rejects unauthorized put:
     [exec]       ✓ rejects unauthorized put
     [exec]     DELETE /api/v1/articles/:articleId
     [exec]       ◦ rejects unauthorized delete:
     [exec]       ✓ rejects unauthorized delete
     [exec]
     [exec]   Authorized requests
     [exec]     GET /api/v1/articles
     [exec]       ◦ respond with json:
     [exec]       ✓ respond with json
     [exec]     POST /users/session
     [exec]       ◦ logs in user:
     [exec]       ✓ logs in user (74ms)
     [exec]     POST /api/v1/articles
     [exec]       ◦ rejects missing post data:
     [exec]       ✓ rejects missing post data
     [exec]     POST /api/v1/articles
     [exec]       ◦ creates a new article:
     [exec]       ✓ creates a new article (47ms)
     [exec]     GET /api/v1/articles
     [exec]       ◦ respond with json:
     [exec]       ✓ respond with json
     [exec]     GET /api/v1/articles/:articleId
     [exec]       ◦ responds with a single json article:
     [exec]       ✓ responds with a single json article
     [exec]     PUT /api/v1/articles/:articleId
     [exec]       ◦ updates a article:
     [exec]       ✓ updates a article (60ms)
     [exec]     GET /api/v1/articles/:articleId
     [exec]       ◦ respond with a single json article:
     [exec]       ✓ respond with a single json article
     [exec]     DELETE /api/v1/articles/:articleId
     [exec]       ◦ deletes a single article:
     [exec]       ✓ deletes a single article
     [exec]     GET /api/v1/articles/:articleId
     [exec]       ◦ respond with a not found article message:
     [exec]       ✓ respond with a not found article message
     [exec]
     [exec]
     [exec]   13 passing (347ms)
     [exec]

app-stop:
     [echo] Stop app.js

stop-redis-container:
     [exec] redis-ci

rm-redis-container:
     [exec] redis-ci

stop-mongodb-container:
     [exec] mongodb-ci

rm-mongodb-container:
     [exec] mongodb-ci

main:

BUILD SUCCESSFUL
Total time: 11 minutes 11 seconds
Performing Post build task...
Could not match :BUILD FAILED  : False
Logical operation result is FALSE
Skipping script  : sudo docker stop redis-ci && sudo docker rm redis-ci
END OF POST BUILD TASK 	: 0
Could not match :BUILD FAILED  : False
Logical operation result is FALSE
Skipping script  : sudo docker stop mongodb-ci && sudo docker rm mongodb-ci
END OF POST BUILD TASK 	: 1
Finished: SUCCESS

MEANR Quick Install Screencast

MongoDB, Express, AngularJS, Node.js and Redis - MEANR

You can check out a short youtube screencast of the quick install steps
for the open source MEANR Full Stack at http://youtu.be/WzvgWYE9XnY

MEANR Full Stack Intro

MongoDB, Express, AngularJS, Node.js and Redis - MEANR

MEAN and MEANR stacks are great for modern full stack Javascript web development.

There are some really good starter boiler plates and apps like:

But how do you get your MEAN app from your local environment to a production site?

How can you do this professional manner with team development, automated testing and proper
deployment stages from local to staging to quality assurance and then to production?

MEANR Full Stack looks to address each of these questions.

MEANR Full Stack is boiler plate that comes with a simple AngularJS ‘Articles’ app
with DevOps and Deployment.

DevOps is automated infrastructure (servers) with Chef

Deployment is with Capistrano

Check out the repo and docs for more overview, installation and usage details here:
MEANR Full Stack

In the coming days and weeks I’ll be publishing some screencasts
that will step through installation and usage.